Student Services Center, 2nd Floor | (501) 569-3110 or (501) 683-7270 | ualr.edu/records | Registration Guide Website: ualr.edu/records/get-registered
Registration Guide
The Office of Records and Registration acts as a registration resource for students and the campus community. The office provides a number of online services to students through their BOSS accounts, including:
- Registration (Sign up for classes)
- Enrollment Verification
- Degree Verification
- Official Transcripts
Students may also print an unofficial transcript through BOSS.
The Academic Year
The academic year includes two regular semesters in the fall and spring, each with four accelerated terms within the semester, and a summer semester with four terms. The unit of credit is the semester hour. This unit is defined as credit earned for the completion of one hour per week in class for one semester. Two hours or more of laboratory work per week for one term equals one-semester hour of credit. UA Little Rock offers night and weekend courses, web-based courses, courses on campus and at various off-campus locations. Admission requirements, fees, and academic performance for night and weekend classes are the same as for day classes.
Online Registration Guide and Class Search
After you have been advised, the next step toward taking courses at UA Little Rock is to view the UA Little Rock Registration Guide (ualr.edu/records/get-registered) and Class Search (https://a.ualr.edu/classes/).
The UA Little Rock Registration Guide and Class Search websites contain information on the web registration process and list the courses that will be offered during specific semesters by course, time, location, and instructor. At the Office of Records and Registration website (ualr.edu/records), you can also find the academic calendar, the final examination schedule, and deadlines for various activities during the semester.
Please be aware that students may not enroll for more than 18 credit hours in a regular semester (Fall or Spring) or more than 7 credit hours in a five-week Summer term without prior permission of the person who approves his or her degree plan.
Courses and programs are also offered through web-based delivery as well as at off-campus locations. Off-campus and online credit courses are identified by location in the UA Little Rock Registration Guide and Class Search.
During a full, 14-week semester or term, the usual three-credit-hour daytime course will meet for 50 minutes a day on Monday, Wednesday, and Friday, or for 1 hour and 15 minutes on either Monday and Wednesday or Tuesday and Thursday.
Some classes will meet on different time schedules, such as one three-hour session per week. All these options are part of UA Little Rock’s effort to offer classes in times and places that suit the needs of all students, but it also means you have to read the UA Little Rock Class Search carefully.
Examples of a typical course entry and an explanation of each part of this listing is provided below. The format of the information may vary depending on which view of the student schedule you use, but the meaning of each component will be the same.
- CRN: 60344 – The five-digit course reference number (CRN) assigned for registration. The five-digit CRN number is necessary for registration and is not the same as the course number.
- Subject: HIST – The department or curriculum area with its assigned four-letter code. In this case, it is “HIST” for “History.”
- Course Number: 1311 – The course number assigned by the department. It indicates the level and number of credit hours for the course. Note: The second number indicated the semester hours. This class is 3 semester credit hours.
- Section: 03 – The section number assigned by the department.
- Title: Hist Of Civilization I – The course title. Abbreviated versions of long course titles may be used. Descriptions of all courses appear within their respective departments in numerical order by course number.
- Available Seats: 0 – This is the total number of students that may sign up for this class.
- Class meets MWF – The days the class meets, in this case, each Monday, Wednesday, and Friday. Other abbreviations include “MW” or Monday and Wednesday, “TR” or Tuesday and Thursday, “S” means Saturday, “U” means Sunday, and “TBA” indicates “to be announced.” “TBA” is often used for online classes.
- Time: 10:00 am – 10:50 am – The time the class begins and ends. The abbreviation TBA in this place means “to be announced.” The exact time for TBA courses will be provided by the department or instructor.
- Instructor: Anson, Edward M. – The name of the instructor assigned to this class. If the word “Staff” appears here, the teacher for the class had not yet been assigned at the time the schedule was prepared.
Registering for Classes Using BOSS
Once you have successfully logged into your BOSS account, you’ll have two options for registering for classes. The first option is through BOSS. Choose the Student Services option from the menu, then from there, choose the Registration option from the menu. This will bring you to the registration page, which will provide you with a registration-focused menu. From this page, you will choose Register/Search for Classes. The system will ask you to specify which term you would like to register for. Once you choose the appropriate term you will be brought to the class search page.
Choose your subject from the list provided and click the Course Search button. A list of courses should appear at this point. You will need to click on the View Sections button next to the course that you are interested in registering for in order to view all of the available meeting times for that course.
As you review the meeting times for your course, you should look to the left of each class and check for the following:
- A checkbox: This means that you can register for this course.
- C: Closed. All available seats have been taken.
- NR: No Registration. Registration is currently not available at this time.
- SR: Student Restriction. You may not register for any courses until certain issues are resolved. Choose the View Registration Status option from the bottom of the page to find out the status of your account.
- Nothing: You are currently registered for this course. You will need to click on the checkbox of the class (classes) that you want to take. You will then go to the bottom of the page and click on the Register button.
Some things to note:
- Depending on your screen size there may be information to the right of the page that you cannot see without scrolling.
- Web-based courses have a building designation of “Web” and courses offered at other locations will note the other location in the building designation and comments (for example, courses offered at Benton, Arkansas have a building designation of “BNTN”). Courses offered in these locations are typically last in the list of meeting times. This information is usually to the far right of your screen.
- Some courses have both a lecture and a lab that must be taken during the same semester. To register for these types of courses, you will need to place a check next to both classes before you click on the Register button
- If you have been given an override from your advisor or instructor to register for a course, you will not be able to register for the course utilizing the Register/Search for Classes menu in BOSS. Instead, you’ll need to go to the Student Services tab in BOSS, then follow the link to Registration. Once you are in the Registration menu, then choose the Add/Drop Classes link. Once you are at the Add/Drop Classes screen, you can enter the CRN of the course for which you’ve been provided an override in the “Add Classes Worksheet” area of this page in the boxes provided, then click “Accept Changes.”
NOTE: The second option is discussed below.
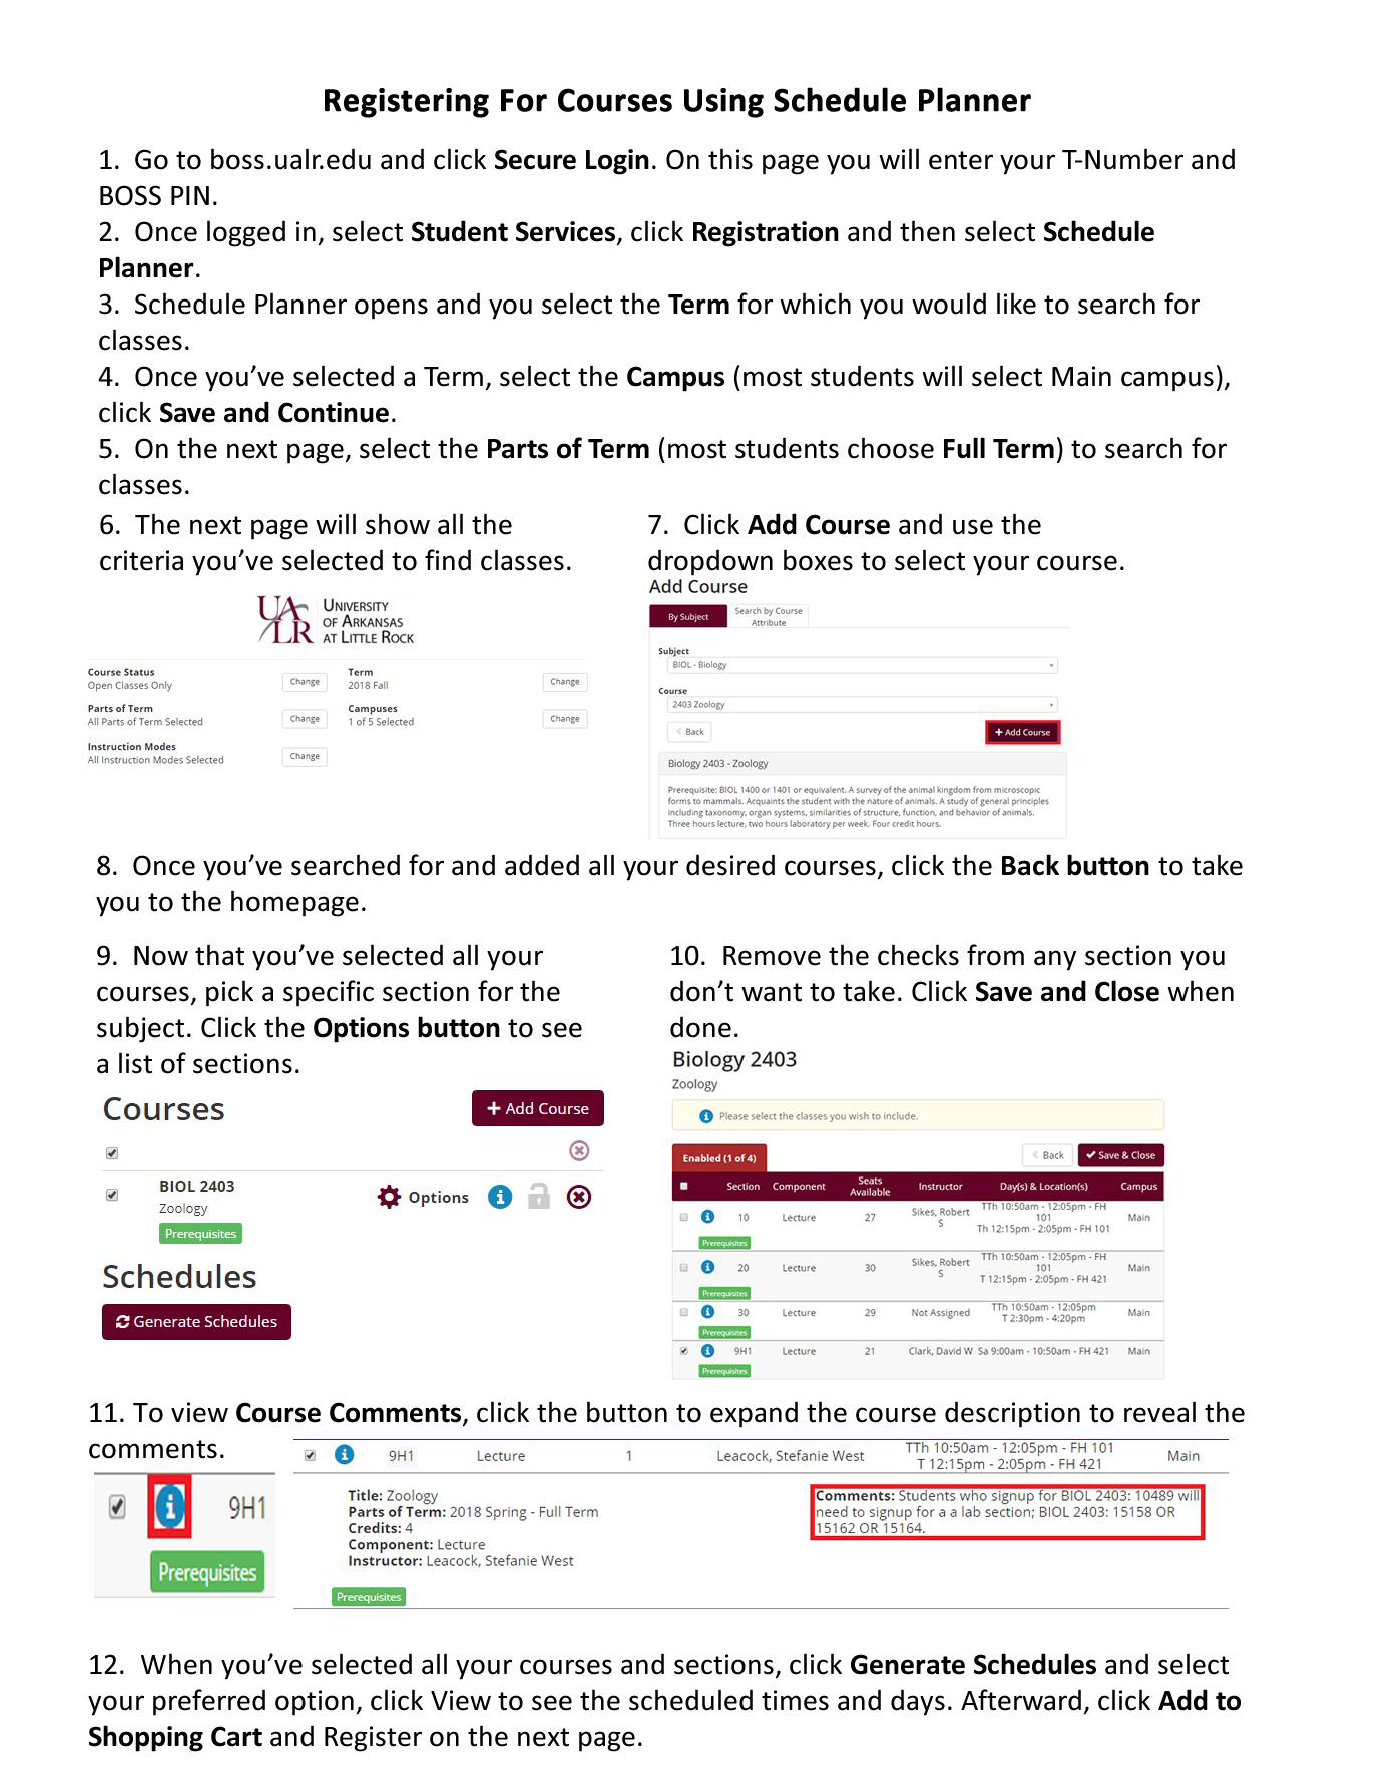
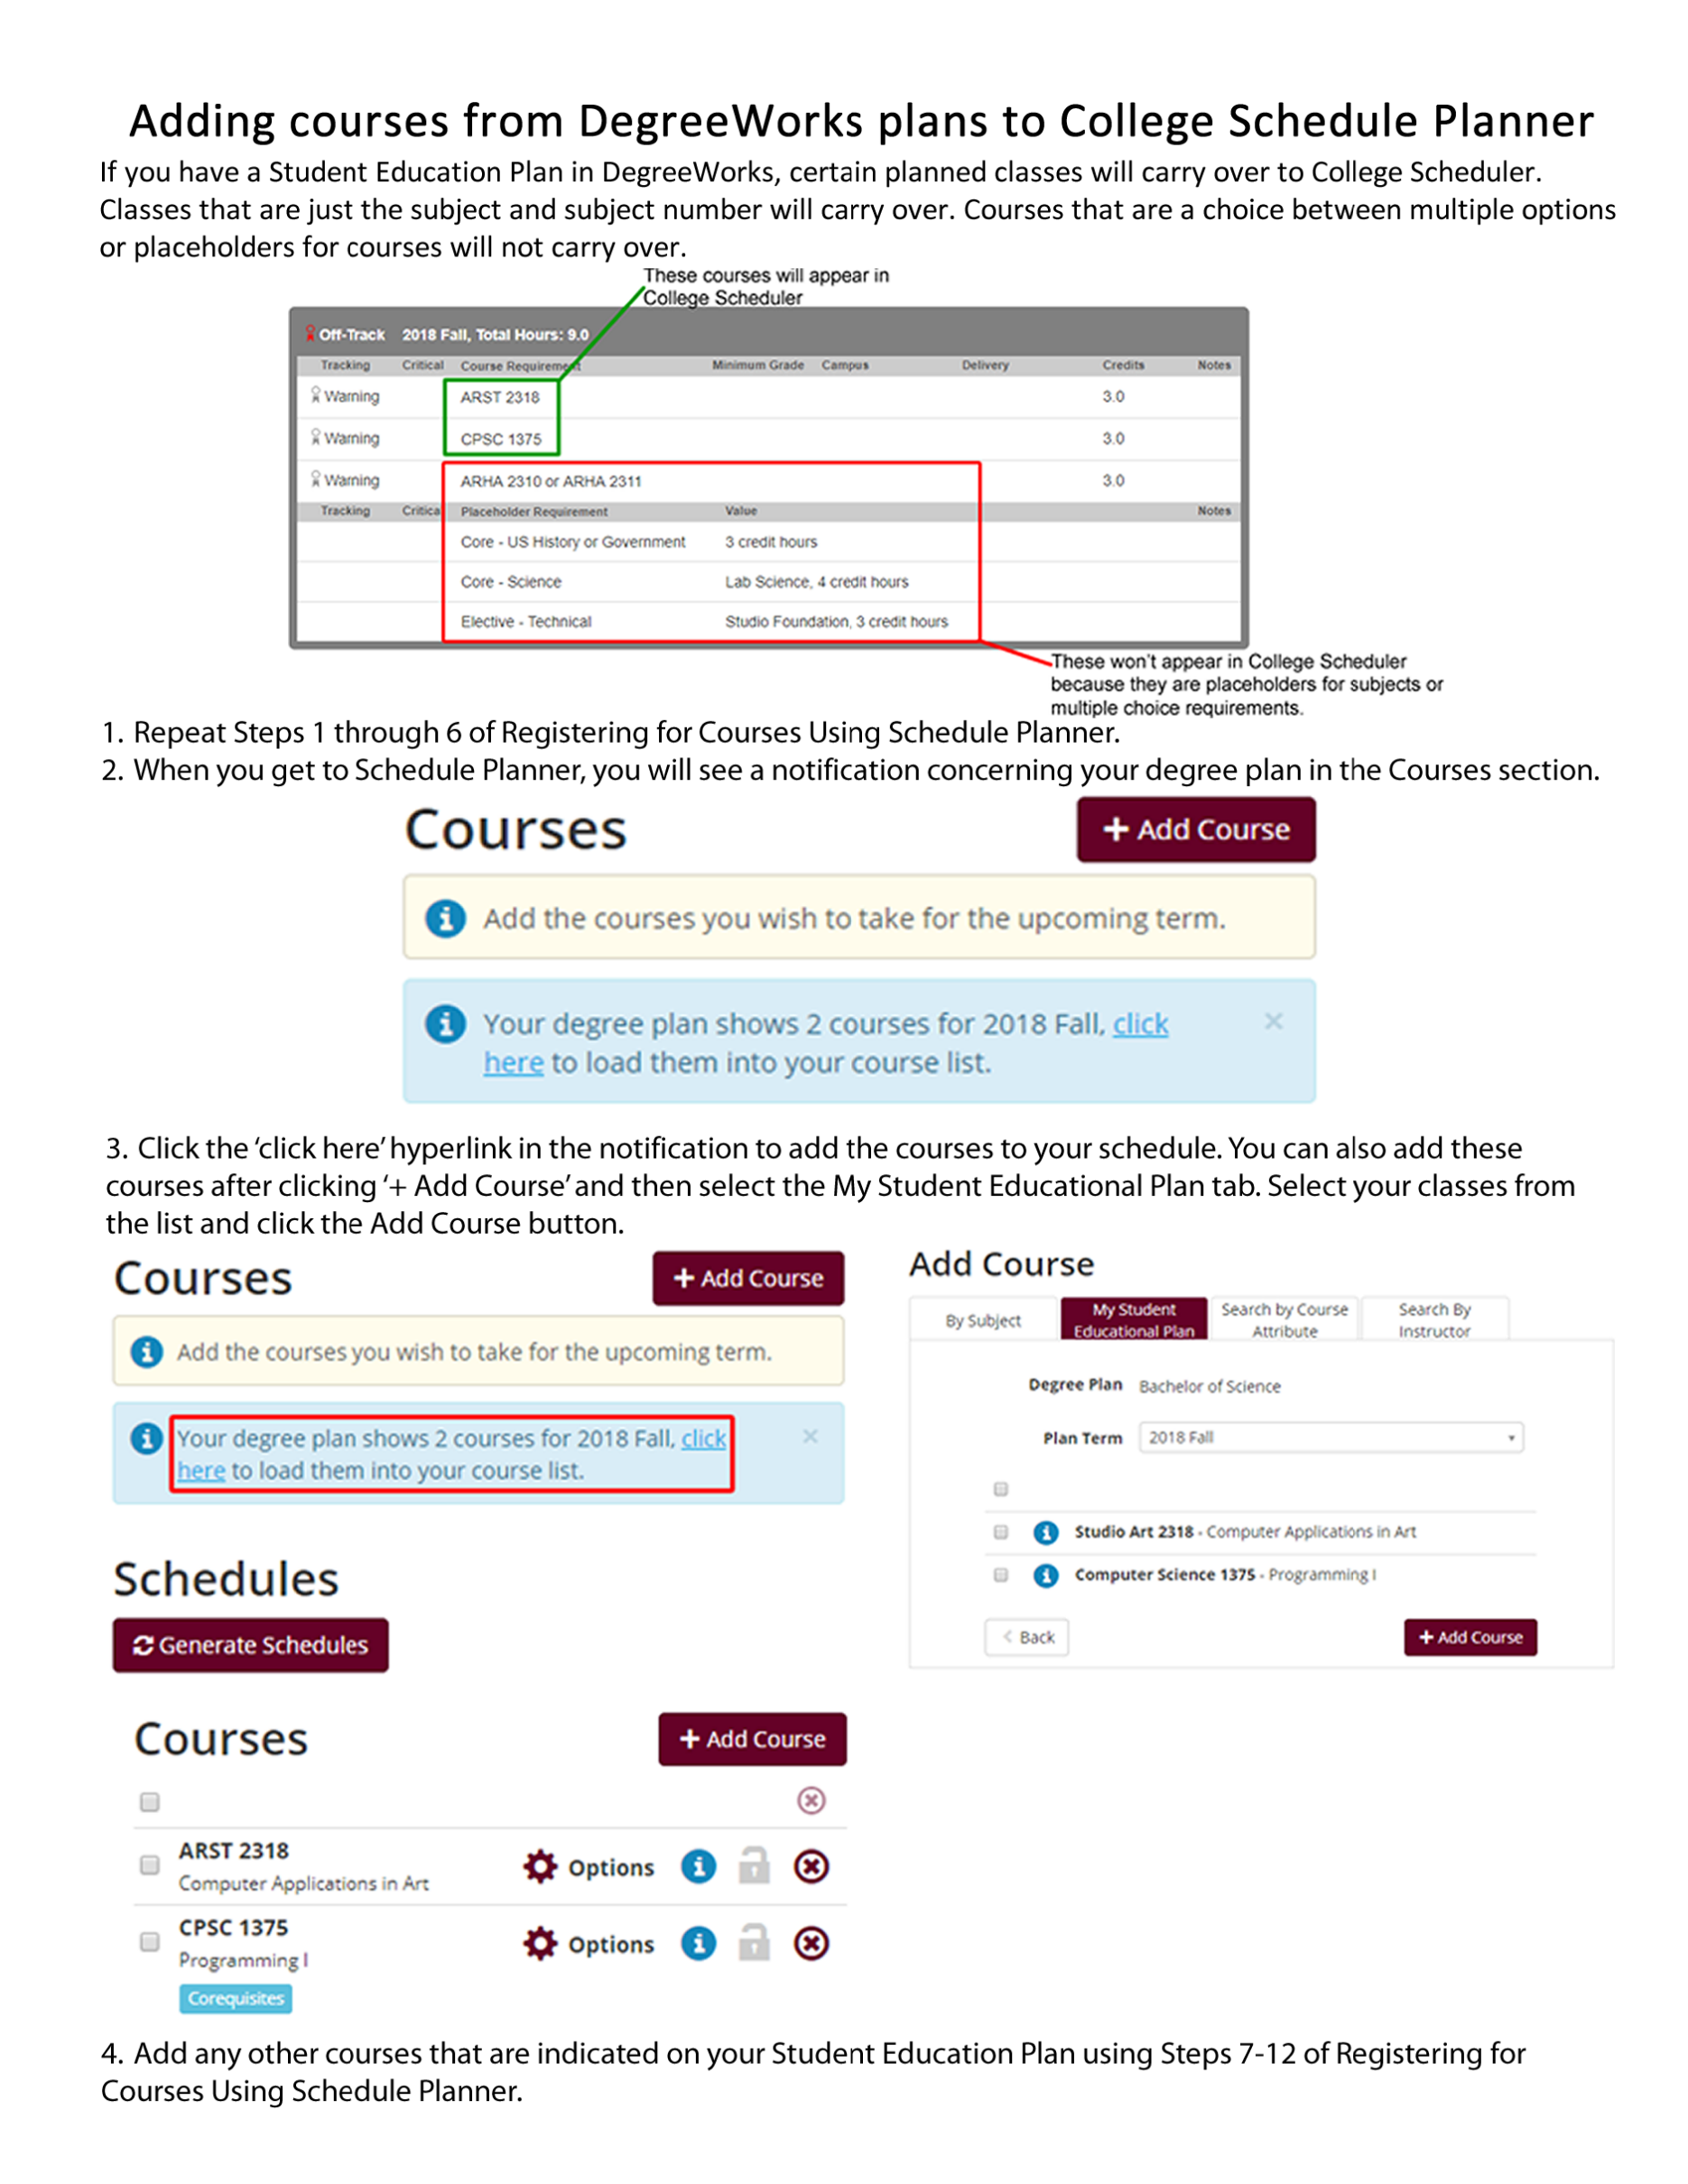
Registering for Classes Using Schedule Planner
Your second option for registering for courses is Schedule Planner.
- Once you’ve selected the Student Services option, then gotten to the Registration menu, you will choose Schedule Planner.
- Once selected, you will be asked to select the desired term you would like to register for. You will be automatically redirected to the Scheduler Planner page.
- Select your Campus and Parts of Term.
- Click Add Course to find courses, which you will do by selecting the Subject Code and Course Number for the drop-down menus.
- Once you find the course you are looking for click Add Course.
- Repeat until you have added all your needed courses, which at this point, you will click the Back button. You will need to click the Options button next to each course and uncheck all the sections you don’t want to be enrolled for.
- Click Save and Close when done. When you’ve selected all your courses and sections, click Generate Schedules and select your preferred schedule (click View to see the scheduled times and days). Afterward, click Add to Shopping Cart and Register on the next page.


|